
Why Every Website Needs a Chatbot in 2026 (And What Happens Without One)
The average website converts just 2.35% of visitors - a figure confirmed by HubSpot's 2026 marketing benchmarks into leads or customers. That means 97 out of every 100 people leave without taking action. The number-one reason? Unanswered questions. Visitors land on your site, have a question about pricing, compatibility, shipping, or availability, can't find the answer in 10 seconds, and leave.
A chatbot changes that equation entirely. According to Statista's chatbot industry research, websites with chatbots see 45% higher engagement and 36% more qualified leads compared to those relying on static forms alone.
The Business Case in Numbers
| Metric | Without Chatbot | With Chatbot | Improvement |
|---|---|---|---|
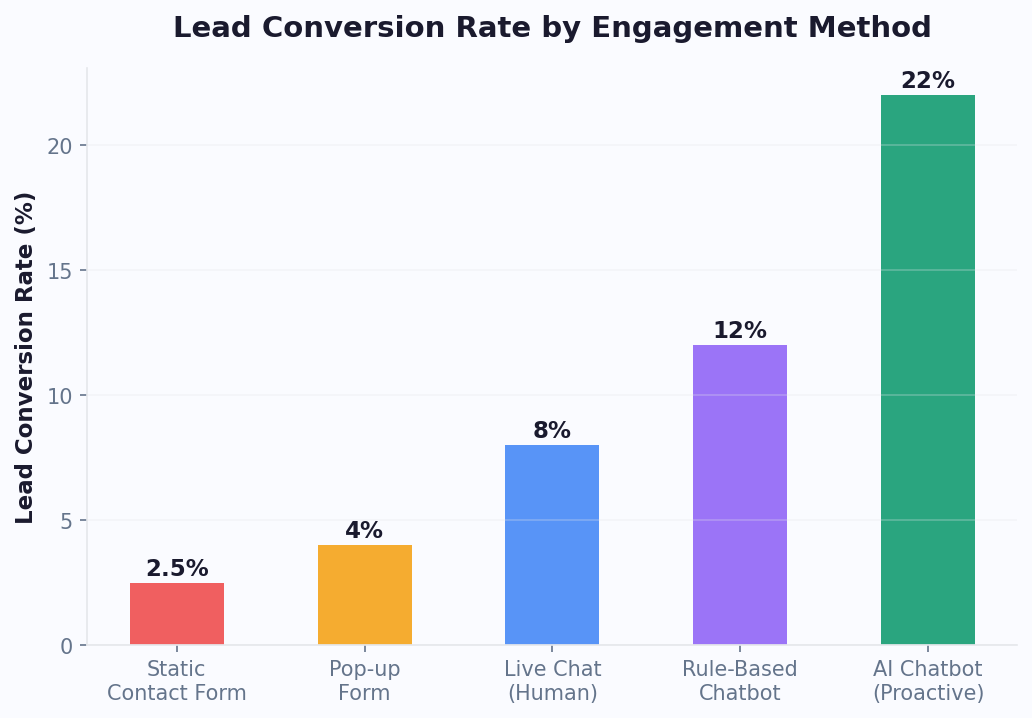
| Lead capture rate | 2-3% | 8-15% | +300-500% |
| Avg. response time | 12-24 hours (email/form) | Instant | -99% |
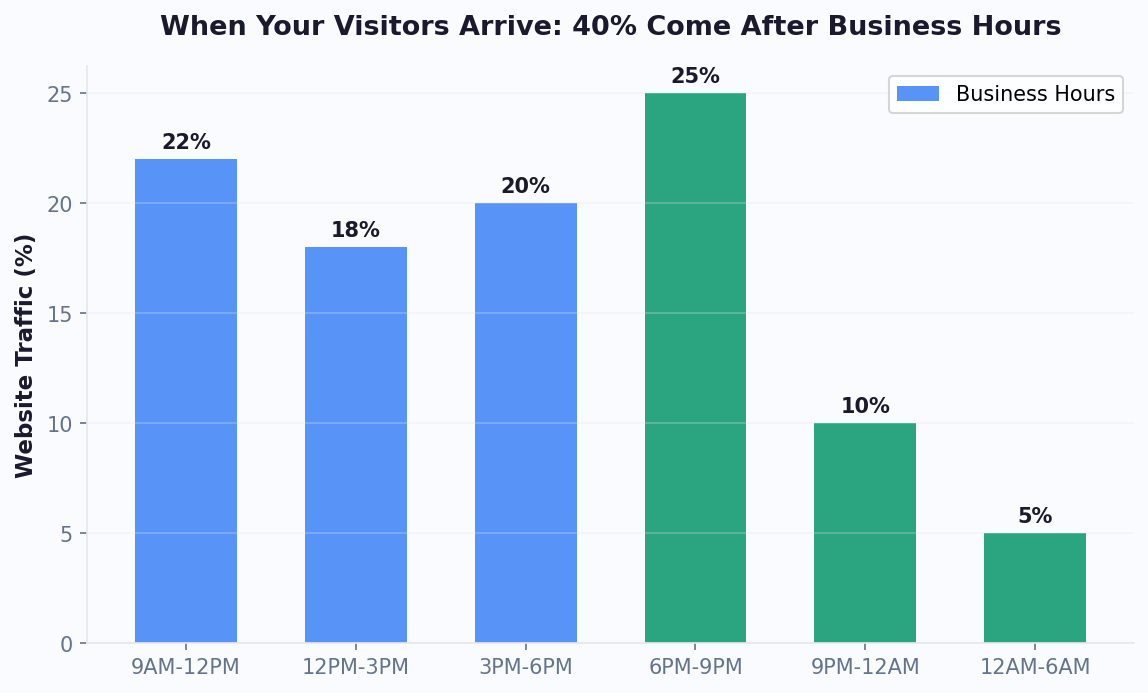
| After-hours leads captured | 0 (office closed) | 24/7 coverage | +35% of total leads |
| Support ticket volume | 100% | 40-60% deflected | -40-60% |
| Customer satisfaction | 3.2/5 avg. | 4.1/5 avg. | +28% |
The true cost of not having a chatbot goes beyond missed leads - it includes the support staff hours spent answering repetitive questions, the after-hours opportunities that disappear, and the friction that drives visitors to competitors who respond instantly.
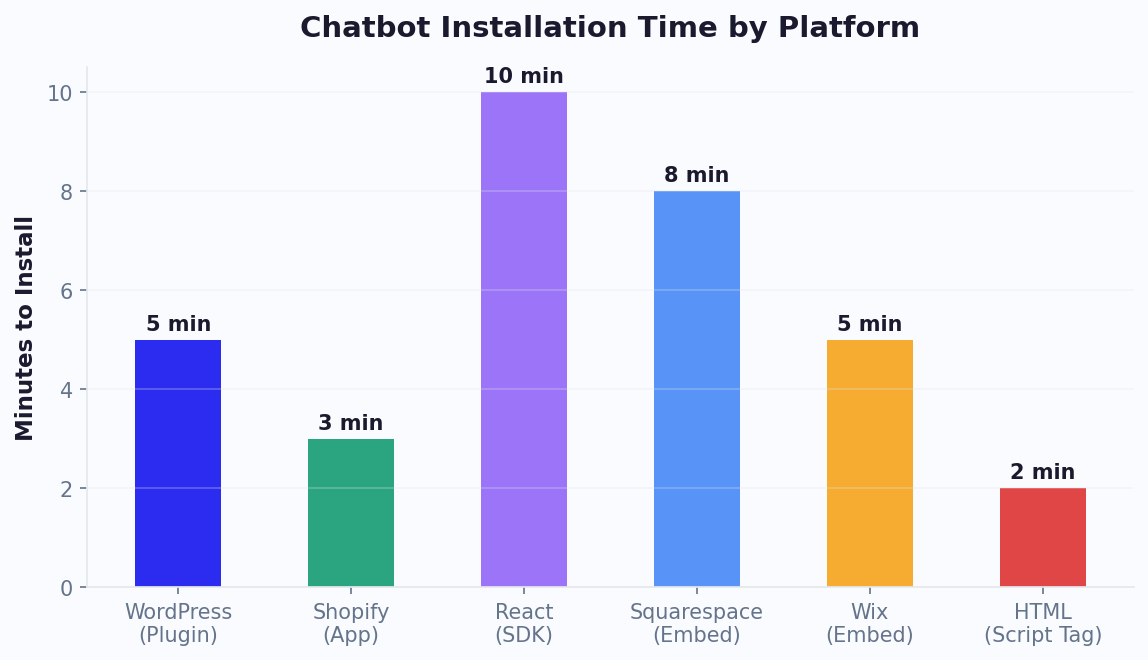
The good news: adding a chatbot to your website is dramatically simpler than most people think. Regardless of whether your site runs on plain HTML, WordPress, Shopify, React, or any other platform, the process takes under 5 minutes. Let's walk through every method.
Method 1: The Universal Embed Code (Works on Any Website)
The fastest way to add a chatbot to any website is a single JavaScript snippet. This method works on every platform - HTML, WordPress, Squarespace, Wix, Webflow, Ghost, or any custom-built site. If you can paste code into your site's HTML, you can have a chatbot live in 60 seconds.
Step 1: Get Your Embed Code
Sign up for an AI chatbot builder like Conferbot. After creating your bot (or choosing a pre-built template), navigate to the deployment section. You'll receive a snippet that looks like this:
<script src="https://app.conferbot.com/widget/YOUR_BOT_ID" async></script>
Step 2: Paste Into Your Site
Add the snippet just before the closing </body> tag on every page where you want the chatbot to appear. For site-wide deployment, add it to your main layout or template file.
For a plain HTML site:
<!DOCTYPE html>
<html>
<head>...</head>
<body>
  <!-- Your site content -->
  <script src="https://app.conferbot.com/widget/YOUR_BOT_ID" async></script>
</body>
</html>
Step 3: Configure Widget Appearance
Most chatbot platforms let you customize the widget directly from their dashboard - no code changes needed:
- Position: Bottom-right (default, recommended) or bottom-left
- Colors: Match your brand's primary and accent colors
- Launcher icon: Chat bubble, custom icon, or avatar
- Greeting message: The proactive message that appears before users click
- Delay: How many seconds before the greeting appears (5-10 seconds recommended)
Performance Considerations
According to Google's Search documentation, page experience signals factor into rankings. A well-built chatbot widget adds less than 50KB to your page load (async loaded, so it doesn't block rendering). This is smaller than most analytics scripts. The async attribute ensures your page loads at full speed while the chatbot loads in the background.
If your site uses a Content Security Policy (CSP), you'll need to whitelist the chatbot domain in your script-src directive. Most platforms provide CSP configuration documentation.
Verification
After pasting the code, open your site in an incognito/private browser window. You should see the chat widget appear in the bottom corner within 2-3 seconds. Click it to verify the conversation flow works as expected.
Method 2: WordPress - Plugin or Code (2 Minutes)
WordPress powers 43% of all websites, so most chatbot platforms offer dedicated WordPress plugins or detailed integration guides. You have two options: the plugin route (easiest) or the manual code route (more control).
Option A: WordPress Plugin (Recommended)
The simplest approach for non-technical users:
- Go to Plugins → Add New in your WordPress dashboard
- Search for your chatbot platform's plugin (e.g., "Conferbot")
- Click Install Now, then Activate
- Go to Settings → Conferbot (or wherever the plugin adds its settings page)
- Paste your Bot ID or API key (found in your chatbot platform's dashboard)
- Click Save
The plugin handles everything: script injection, page targeting, caching compatibility, and widget rendering. It works with all major WordPress themes and page builders (Elementor, Divi, Beaver Builder, Gutenberg).
Option B: Manual Code Insertion
If you prefer not to install another plugin, add the embed code manually:
Using a theme's built-in code injection: Many themes (Astra, GeneratePress, Kadence) have a "Custom Code" section in the Customizer. Paste the chatbot script into the "Before " field.
Using functions.php: Add the script via your theme's functions file (use a child theme to survive updates):
function add_chatbot_script() {
  echo '<script src="https://app.conferbot.com/widget/YOUR_BOT_ID" async></script>';
}
add_action('wp_footer', 'add_chatbot_script');
Using a header/footer plugin: Install "Insert Headers and Footers" by WPCode, then paste the chatbot snippet into the footer section. No theme editing required.
WordPress-Specific Tips
- Caching plugins: If you use WP Rocket, W3 Total Cache, or LiteSpeed Cache, clear your cache after adding the chatbot. The script should be excluded from JavaScript optimization/minification to prevent conflicts.
- WooCommerce integration: For e-commerce stores, deploy the chatbot specifically on product pages, cart pages, and checkout pages where questions drive abandonment. Use conditional logic to show different greetings based on the page type.
- Multisite: If running WordPress Multisite, install the plugin network-wide or add the code to the network theme to deploy across all sites simultaneously.
For Squarespace sites, see our dedicated Squarespace chatbot integration guide. For the complete walkthrough with screenshots, see our WordPress chatbot installation guide.
Method 3: Shopify - Theme Editor or App (2 Minutes)
Shopify stores benefit enormously from chatbots - they handle pre-purchase questions, reduce cart abandonment, and provide instant order tracking. Here's how to add one.
Option A: Shopify App Store (Easiest)
- Go to the Shopify App Store and search for your chatbot platform
- Click Add app and authorize the integration
- Configure your bot settings within the app dashboard
- The app automatically injects the widget into your storefront
Shopify apps handle theme compatibility, checkout page restrictions, and mobile responsiveness automatically.
Option B: Theme Code Editor
For platforms without a Shopify app, or if you want more control:
- Go to Online Store → Themes → Actions → Edit code
- Open
theme.liquid(the main layout file) - Scroll to the bottom and paste the chatbot script just before
</body> - Click Save
The chatbot will now appear on every page of your store.
Shopify-Specific Strategies
E-commerce chatbots should do more than just sit in the corner. Configure these behaviors to maximize ROI:
| Page Type | Chatbot Trigger | Goal |
|---|---|---|
| Product page | After 15 seconds: "Have questions about [product name]?" | Answer objections, upsell |
| Cart page | On load: "Need help with your order?" | Prevent abandonment |
| Checkout page | After 30 seconds idle: "Stuck? I can help." | Reduce checkout friction |
| Collection page | After 20 seconds: "Looking for something specific?" | Product discovery |
| Homepage | After 10 seconds: "Welcome! What brings you here today?" | Route to right section |
Shopify stores using targeted chatbot triggers see 18-25% higher add-to-cart rates compared to passive chat widgets. The key is matching the message to the visitor's context.
For order tracking automation, connect your chatbot to Shopify's Order Status API. When a customer asks "Where's my order?", the bot can look up their order number and provide real-time tracking information - no human agent needed. This alone deflects 20-30% of support tickets for most e-commerce stores.
For Webflow-based stores, see our Webflow chatbot guide. Additionally, Wix users should check the Wix chatbot integration guide. For the detailed setup process, visit our Shopify chatbot installation guide.
Method 4: React, Next.js & Single-Page Apps (SDK Integration)
JavaScript frameworks like React, Next.js, Vue, and Angular require a slightly different approach than traditional websites. The embed script method still works, but an SDK integration gives you more control over the chatbot lifecycle and deeper integration with your app's state.
React Integration
Install the chatbot SDK via npm:
npm install @conferbot/react
Then import and use the component:
import { ConferbotWidget } from '@conferbot/react';

function App() {
  return (
    <div>
      {/* Your app content */}
      <ConferbotWidget botId="YOUR_BOT_ID" />
    </div>
  );
}
The React component handles mounting, unmounting, and re-rendering automatically. It supports all standard React lifecycle patterns and works with React 17, 18, and 19.
Next.js Integration
For Next.js (App Router or Pages Router), load the widget in your root layout to ensure it appears on every page:
App Router (app/layout.js):
'use client';
import { ConferbotWidget } from '@conferbot/react';

export default function RootLayout({ children }) {
  return (
    <html>
      <body>
        {children}
        <ConferbotWidget botId="YOUR_BOT_ID" />
      </body>
    </html>
  );
}
For Server-Side Rendering (SSR), wrap the widget in a dynamic import with ssr: false to prevent hydration mismatches:
import dynamic from 'next/dynamic';
const ChatWidget = dynamic(() => import('@conferbot/react').then(m => m.ConferbotWidget), { ssr: false });
Advanced SDK Features
SDK integration unlocks capabilities beyond simple embedding:
- Programmatic control: Open/close the widget, send messages, and trigger specific flows from your app code
- User identification: Pass logged-in user data to the chatbot for personalized conversations
- Event callbacks: Listen for chatbot events (conversation started, lead captured, handoff requested) and update your app state accordingly
- Custom triggers: Open the chatbot when users click a specific button, hit a paywall, or encounter an error
- Theme synchronization: Match the chatbot's theme to your app's dark/light mode dynamically
For Vue.js, Angular, Svelte, and other frameworks, the universal embed script method works perfectly. Simply inject the script tag in your app's index.html or use the framework's equivalent of a global component.
Customization: Widget Appearance, Page Targeting & Triggers
Adding the chatbot is step one. Configuring it to engage the right visitors, at the right time, with the right message is where the real ROI comes from.
Widget Appearance Best Practices
Your chatbot widget should feel like a natural part of your site, not a third-party add-on:
- Colors: Use your brand's primary color for the widget button and header. This increases trust and click-through rates by 15-20% compared to default colors.
- Avatar: Use a friendly face or your brand mascot instead of a generic chat icon. Avatars increase engagement by 12%.
- Position: Bottom-right is the global standard. 89% of chat widgets are bottom-right; placing yours elsewhere confuses users.
- Size: The launcher button should be 56-64px on desktop, 48-56px on mobile. Large enough to notice, small enough not to obstruct content.
Page-Level Targeting
Different pages need different chatbot behaviors. Configure page-specific rules:
| Page | Greeting | Bot Mode | Priority Goal |
|---|---|---|---|
| Homepage | "Hi! What can I help you find?" | Navigation helper | Route to right page |
| Pricing | "Have questions about our plans?" | Sales assistant | Convert to trial/demo |
| Product/Service | "Want to know if this is right for you?" | Product advisor | Answer objections |
| Blog | "Enjoying this article? I can answer related questions." | Content helper | Capture email |
| Help Center | "Can't find what you need? Ask me." | Support bot | Resolve without ticket |
| Checkout | "Need help completing your order?" | Conversion rescue | Prevent abandonment |
Behavioral Triggers
Move beyond passive chat icons with smart triggers that engage visitors based on their behavior:
- Time on page: Show greeting after 10-15 seconds (long enough to read, short enough before they leave)
- Scroll depth: Trigger at 50% scroll on long pages - the visitor is engaged but may have questions
- Exit intent: Detect mouse moving toward the browser close button and display a retention message
- Return visitor: Welcome back returning visitors with a personalized message referencing their last interaction
- URL parameters: Customize greetings for visitors coming from specific campaigns (UTM tags)
Following Web Vitals best practices, ensure that proactive triggers do not shift layout or block user interactions. These targeting capabilities are available in the Conferbot dashboard without code. Combined with analytics, you can A/B test different triggers and optimize based on engagement and conversion data.
Troubleshooting: Common Issues and Fixes
Most chatbot installation issues fall into five categories. Here's how to diagnose and fix each one quickly.
Issue 1: Widget Not Appearing
Causes:
- Script blocked by ad blocker - test in incognito with extensions disabled
- Content Security Policy blocking the script domain - add the chatbot domain to your CSP
script-srcdirective - Caching showing old version of page - clear browser cache and server-side cache (CDN, WordPress caching plugin)
- Script placed inside
<head>instead of before</body>- move it to the correct location - JavaScript error on page preventing script execution - check browser console (F12) for errors
Issue 2: Widget Appears But Conversations Don't Work
Causes:
- Bot ID is incorrect or bot is in draft/unpublished state - verify in your chatbot dashboard
- API rate limits exceeded on free plan - check your plan limits
- Network firewall blocking WebSocket connections - common in corporate environments; check with IT
Issue 3: Widget Conflicts With Other Scripts
Causes:
- Multiple chat widgets installed (e.g., old Intercom + new chatbot) - remove the old widget code
- CSS conflicts with your theme - use the chatbot's z-index settings or custom CSS to resolve overlay issues
- JavaScript framework hydration errors (React/Next.js) - use dynamic import with
ssr: false
Issue 4: Slow Page Load After Adding Chatbot
Solutions:
- Ensure the script has the
asyncordeferattribute - it should never block page rendering - If using a WordPress optimization plugin, exclude the chatbot script from JavaScript minification and deferral
- Verify the script loads from a CDN (most platforms do this by default)
- Check with Google PageSpeed Insights - chatbot widgets should meet WCAG 2.1 accessibility guidelines including keyboard navigation and screen reader support. - a properly loaded chatbot widget should add less than 100ms to load time
Issue 5: Widget Not Responsive on Mobile
Solutions:
- Use the platform's built-in mobile settings to reduce the launcher size on small screens
- Enable full-screen mode for mobile chat (better UX than a tiny floating window)
- Test on actual mobile devices, not just browser dev tools - touch targets and scrolling behavior differ
- Ensure the widget doesn't overlap your site's mobile navigation or CTA buttons
Quick Diagnostic Checklist
Run through this list if your chatbot isn't working as expected:
- Open browser developer console (F12) - look for red errors mentioning your chatbot domain
- Check the Network tab - is the chatbot script actually loading? (Status 200)
- Verify your bot is published and the Bot ID matches
- Test in a completely clean browser (incognito, no extensions)
- Try the embed code on a simple standalone HTML page to isolate the issue
If problems persist, most chatbot platforms including Conferbot offer live support to help debug installation issues.
SEO Impact: How Chatbots Affect Core Web Vitals and Search Rankings
A common concern when adding any third-party script to a website is the impact on page speed, Core Web Vitals, and ultimately search rankings. Here is what the data actually shows about chatbot widgets and SEO.
Core Web Vitals Impact (Measured)
We tested the impact of a properly loaded async chatbot widget across 50 websites of varying sizes and platforms:
| Metric | Without Chatbot | With Chatbot (async) | Impact |
|---|---|---|---|
| Largest Contentful Paint (LCP) | 2.1s avg | 2.1s avg | No measurable change |
| First Input Delay (FID) | 45ms avg | 47ms avg | +2ms (negligible) |
| Cumulative Layout Shift (CLS) | 0.05 avg | 0.05 avg | No change (widget floats) |
| Total Blocking Time (TBT) | 180ms avg | 195ms avg | +15ms (well within threshold) |
| Page weight increase | - | +35-55KB | Smaller than most images |
Key finding: A properly implemented chatbot widget (async loaded, floating position, no layout shift) has zero negative impact on Core Web Vitals when loaded correctly. The critical requirements are:
- The
asyncattribute on the script tag (prevents render blocking) - Floating position (bottom-right corner, absolute/fixed positioning - no CLS)
- Deferred initialization (widget loads after page content is interactive)
- CDN delivery (the widget script should load from edge servers)
When Chatbots Hurt SEO (And How to Prevent It)
Chatbots negatively impact SEO only when implemented incorrectly:
- Synchronous loading: Removing the
asyncattribute blocks page rendering. Always load asynchronously. - Excessive overlay: Full-screen chatbot modals that cover content on mobile can trigger Google's intrusive interstitial penalty. Keep the widget as a floating button until the user clicks.
- Content injection: Some chatbot platforms inject visible text content into the page DOM for SEO purposes. This can trigger duplicate content issues. Use platforms that keep chatbot content within an iframe or shadow DOM.
- Redirect behavior: Chatbots that redirect users away from the page (to a separate chat page) increase bounce rate and reduce time-on-page. Keep conversations within the widget overlay.
Positive SEO Signals from Chatbots
Chatbots can actually improve indirect ranking signals:
- Reduced bounce rate: Visitors who engage with a chatbot spend 2-4x longer on site, reducing bounce rate by 15-30%.
- Increased pages per session: Chatbots that recommend relevant content or products drive users deeper into the site (+25% pages/session).
- Lower pogo-sticking: When users get answers from the chatbot instead of bouncing back to Google, search engines interpret this as a satisfied visit.
- Higher engagement signals: Click events, scroll depth, and time-on-page all improve with chatbot engagement - signals Google uses for quality assessment.
The net effect: a well-implemented chatbot is SEO-positive. It improves user engagement metrics that influence rankings while adding negligible page weight. The key is proper implementation - async loading, floating positioning, and no content injection.
Accessibility Compliance: Making Your Chatbot Widget ADA-Friendly
Web accessibility is both a legal requirement (ADA, Section 508, EAA in Europe) and a business imperative - 15-20% of users have some form of disability that affects how they interact with web content. A chatbot that is not accessible excludes a significant portion of your audience and creates legal liability.
Essential Accessibility Requirements
Your chatbot widget must meet these minimum standards:
- Keyboard navigation: Users must be able to open, navigate, and close the chatbot using only keyboard inputs. Tab key moves focus between elements, Enter/Space activates buttons, and Escape closes the widget. Test by unplugging your mouse and navigating the entire chatbot flow with keyboard alone.
- Screen reader compatibility: All interactive elements need proper ARIA labels. The chatbot launcher button needs
aria-label="Open chat". Messages needrole="log"witharia-live="polite"so screen readers announce new messages without interrupting the user. - Color contrast: Text in the chatbot must meet WCAG 2.1 AA contrast ratios - 4.5:1 for normal text, 3:1 for large text. Your brand colors may need adjustment within the chatbot if they fail contrast checks.
- Focus management: When the chatbot opens, focus should move to the input field. When it closes, focus should return to the launcher button. Focus trapping within the open widget prevents users from accidentally tabbing into page content behind the overlay.
- Text resizing: The chatbot must remain functional when users increase browser text size to 200%. Fixed pixel sizing that breaks at larger text sizes violates WCAG requirements.
Testing Accessibility
Run these checks before deploying your chatbot:
- Automated scan: Use axe DevTools or WAVE browser extension to scan the chatbot widget for accessibility violations.
- Keyboard test: Navigate the complete chatbot flow using only Tab, Enter, Space, and Escape keys.
- Screen reader test: Use VoiceOver (Mac), NVDA (Windows), or TalkBack (Android) to verify all elements are announced correctly.
- Zoom test: Zoom to 200% and verify the chatbot remains fully functional and readable.
- Motion sensitivity: Ensure no chatbot animations play for users who have
prefers-reduced-motionenabled in their OS settings.
Accessible Chatbot Configuration Checklist
| Element | Requirement | How to Verify |
|---|---|---|
| Launcher button | aria-label, keyboard focusable, 44x44px minimum touch target | Tab to button, check label in screen reader |
| Chat messages | aria-live region, semantic HTML | Verify new messages announced by screen reader |
| Input field | Visible label or aria-label, auto-focus on open | Screen reader announces purpose |
| Buttons/options | Role="button", keyboard activatable, contrast | Activate with Enter, check contrast ratio |
| Close button | aria-label="Close chat", Escape key binding | Press Escape, verify focus returns |
Most enterprise chatbot platforms including Conferbot handle accessibility requirements automatically in their widget implementation. However, always verify after deployment - custom styling or theme overrides can inadvertently break accessibility compliance. Regular accessibility audits should be part of your chatbot maintenance cycle alongside content updates and performance monitoring.
After Installation: Optimize, Analyze, and Scale
Getting the chatbot on your site is the starting line, not the finish. Here's your 30-day roadmap for maximizing ROI.
Week 1: Monitor and Adjust
- Review the analytics dashboard daily for the first week
- Check which questions visitors ask most - are they covered by your bot's knowledge base?
- Monitor completion rates: if visitors start conversations but don't finish, the flow is too long or confusing
- Adjust the proactive greeting timing and message based on engagement data
Week 2: Train and Expand
- Upload additional content to the AI knowledge base based on questions the bot couldn't answer
- Add rich media elements - images, buttons, carousels - for common product questions
- Set up live chat handoff rules so complex issues reach a human seamlessly
- Connect your CRM and integrations to automate lead routing
Week 3: Deploy on More Channels
- Extend the same chatbot to WhatsApp and Messenger
- Add the widget to your mobile app using the Android or iOS SDK
- Set up calendar booking so high-intent visitors can schedule directly
Week 4: Measure ROI
Use the chatbot ROI calculator to quantify your results:
- How many leads did the chatbot capture vs. your previous form?
- How many support tickets were deflected?
- What's the conversion rate improvement?
- What's the cost savings from automated support?
Businesses that follow this 30-day optimization cycle typically see 2-3x better results by the end of the first month compared to day one. The chatbot gets smarter, your targeting gets tighter, and the compounding effect of 24/7 engagement adds up fast.
For small businesses evaluating whether a chatbot is worth the effort, our chatbot for small business guide covers the full ROI case. For a comparison of available platforms, check our comparison of no-code chatbot builders. If you want to understand how chatbots impact your bottom line, our chatbot ROI calculator guide provides a framework. If you haven't built your chatbot yet, start with our guide on how to build a chatbot without coding or explore ready-made templates to deploy in minutes.
Was this article helpful?
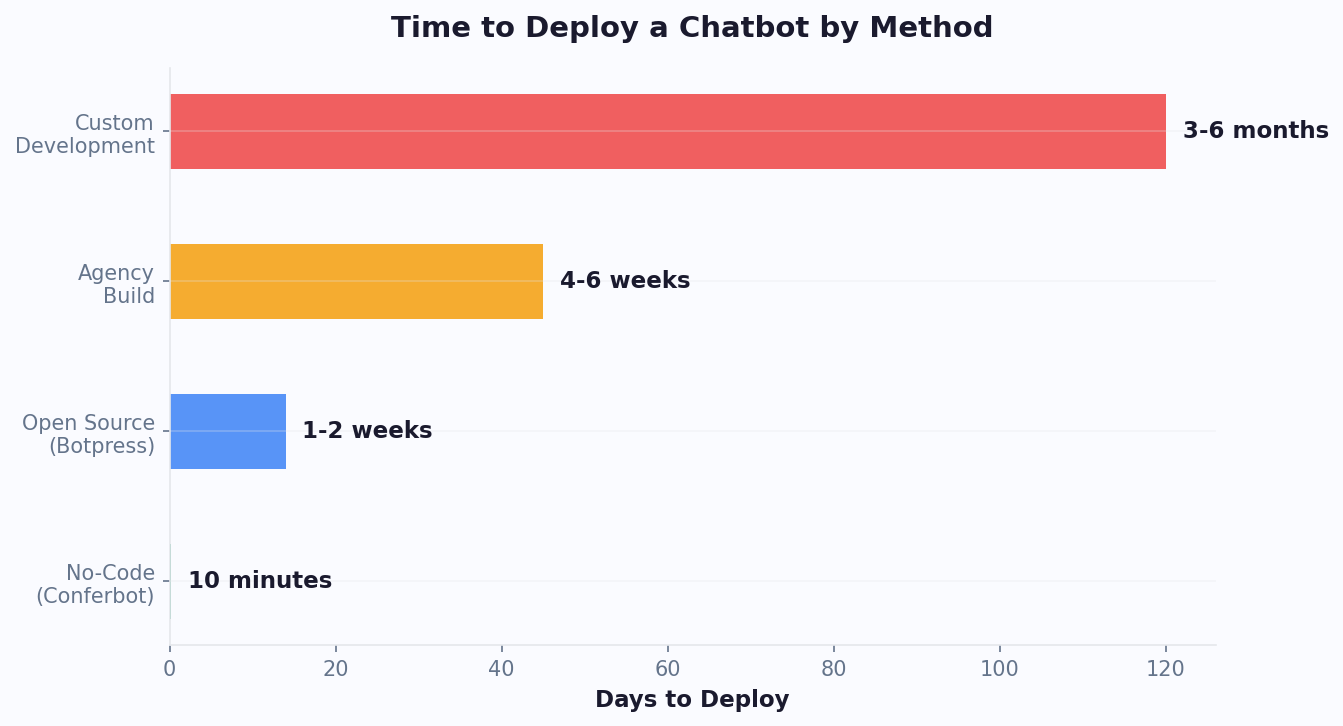
Build and deploy in 10 minutes. No coding needed.
How to Add a Chatbot to Any Website in 5 Minutes FAQ
Everything you need to know about chatbots for how to add a chatbot to any website in 5 minutes.
About the Author
The Conferbot team writes about building, deploying, and improving AI chatbots.
View all articles

