
The Build vs. Buy Decision for React Chatbot Components
Every developer building a product with chat functionality faces the same question: do I build a React chatbot component from scratch, or integrate a pre-built SDK? The answer is not universal - it depends on your team's resources, timeline, feature requirements, and long-term maintenance appetite.
Having shipped chatbot integrations across hundreds of React applications, we have seen both approaches succeed and fail. Here is the honest breakdown.
What "Building" Actually Means
Building a React chatbot component from scratch means owning every layer of the stack:
- UI layer: Chat window, message bubbles, input field, typing indicators, rich media rendering, responsive design, accessibility
- State management: Conversation history, user context, connection status, message queuing, optimistic updates
- WebSocket/SSE layer: Real-time message delivery, reconnection logic, heartbeat, message ordering
- NLP/AI integration: Intent recognition, entity extraction, conversation flow management, context window handling
- Backend infrastructure: Message storage, user sessions, analytics, rate limiting, security
A production-ready chatbot is not a weekend project. Industry benchmarks from Gartner's software development research show that building a production-quality React chat component takes 200-400 developer hours for the initial build, plus 40-80 hours/month for ongoing maintenance, AI model updates, and feature additions. A Stack Overflow analysis of React chat questions reveals that WebSocket management, state synchronization, and mobile responsiveness are the three most common pain points, each requiring specialized expertise beyond typical React development.
What "Buying" Actually Means
Using a pre-built chatbot SDK or platform means integrating a managed service into your React app. Platforms like Conferbot provide:
- Drop-in React component or embed script
- Pre-built conversation flows with AI capabilities
- Managed NLP/LLM infrastructure
- Analytics dashboard and conversation management
- Multi-channel deployment (WhatsApp, Messenger, Instagram)
- CRM and tool integrations
Integration time: 1-4 hours for basic deployment, 1-2 days for full customization. Ongoing maintenance: near zero (the platform handles updates, scaling, and AI improvements). According to Forrester's developer productivity research, teams that adopt SDK-based integrations over custom builds ship features 8x faster and experience 60% fewer production incidents related to chat infrastructure.
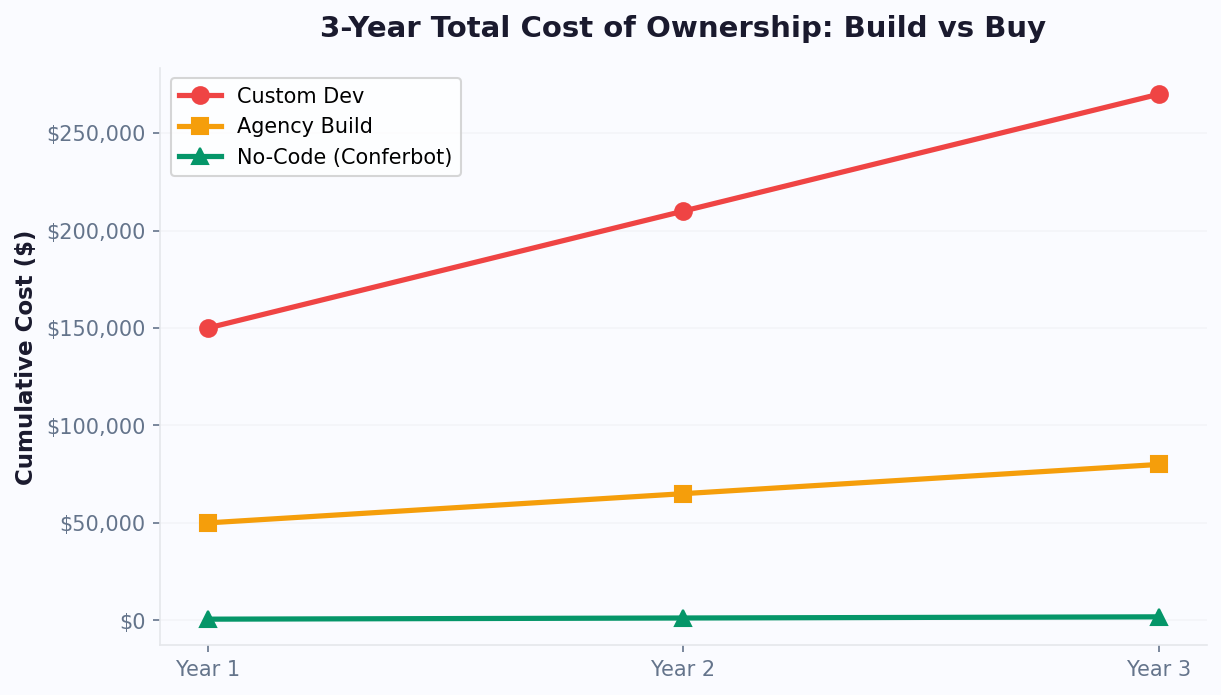
The Real Cost Comparison
| Factor | Build From Scratch | SDK / Platform Integration |
|---|---|---|
| Initial development | 200-400 hours ($30,000-80,000) | 2-16 hours ($300-2,400) |
| Monthly maintenance | 40-80 hours ($6,000-16,000) | Platform fee ($50-500/month) |
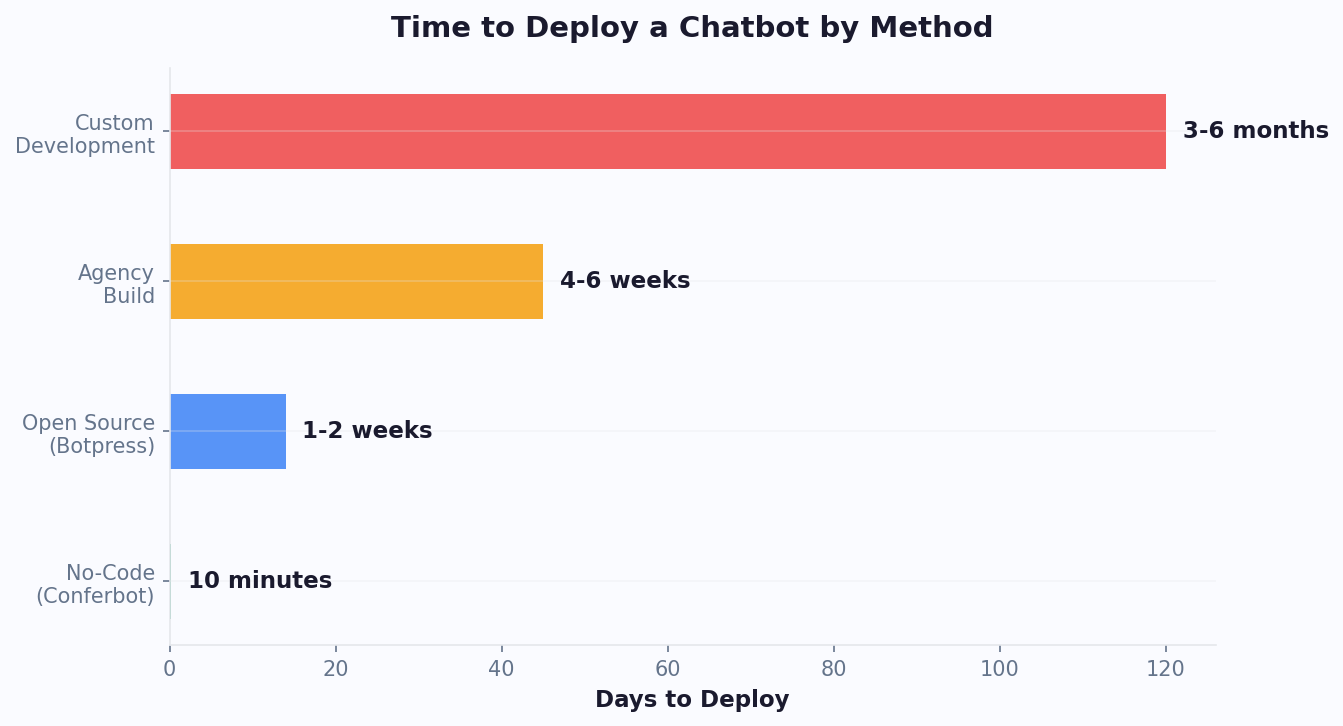
| Time to production | 8-16 weeks | 1-3 days |
| AI/NLP capability | DIY (OpenAI API costs + engineering) | Included in platform |
| First-year total cost | $102,000-272,000 | $900-8,400 |
| Customization depth | Unlimited | High (CSS, API, webhooks) |
| Risk | High (scope creep, maintenance burden) | Low (vendor dependency) |
Building a React Chatbot From Scratch: Architecture and Code
If you decide to build, here is the production architecture and key code patterns you will need. This is not a toy tutorial - it is the architecture we see in successful production deployments.
Component Architecture
A well-structured React chatbot follows this component hierarchy:
ChatbotProvider (context + state)
├── ChatWindow (container + positioning)
│   ├── ChatHeader (title, status, controls)
│   ├── MessageList (virtualized scroll)
│   │   ├── Message (text, bot, user variants)
│   │   ├── TypingIndicator
│   │   └── SystemMessage
│   ├── QuickReplies (button suggestions)
│   └── ChatInput (text, attachments, send)
└── ChatLauncher (floating button/trigger)
Key architectural decisions to make upfront:
- State management: useReducer + Context for simple bots; Zustand or Redux for complex multi-flow chatbots with persistent state
- Message transport: WebSocket for real-time bidirectional communication; SSE (Server-Sent Events) for simpler bot-to-user streaming (sufficient for most chatbot use cases)
- Message format: Define a message schema early. At minimum:
id,type(text, image, card, carousel, quick_reply),sender(user/bot),timestamp,content,metadata
Core Chat Component Example
Here is a minimal but production-oriented React chatbot component structure:
// ChatbotProvider.jsx
import { createContext, useReducer, useContext } from 'react';

const ChatContext = createContext();

const initialState = {
  messages: [],
  isOpen: false,
  isTyping: false,
  connectionStatus: 'disconnected'
};

function chatReducer(state, action) {
  switch (action.type) {
    case 'ADD_MESSAGE':
      return { ...state, messages: [...state.messages, action.payload] };
    case 'SET_TYPING':
      return { ...state, isTyping: action.payload };
    case 'TOGGLE_CHAT':
      return { ...state, isOpen: !state.isOpen };
    case 'SET_CONNECTION':
      return { ...state, connectionStatus: action.payload };
    default:
      return state;
  }
}

export function ChatbotProvider({ children, config }) {
  const [state, dispatch] = useReducer(chatReducer, initialState);
  return (
    <ChatContext.Provider value={{ state, dispatch, config }}>
      {children}
    </ChatContext.Provider>
  );
}

export const useChat = () => useContext(ChatContext);
Message List with Virtualization
For production chatbots, virtualize the message list to handle conversations with hundreds of messages without performance degradation. Use react-window or @tanstack/react-virtual:
// MessageList.jsx - simplified
import { useVirtualizer } from '@tanstack/react-virtual';

function MessageList({ messages }) {
  const parentRef = useRef(null);
  const virtualizer = useVirtualizer({
    count: messages.length,
    getScrollElement: () => parentRef.current,
    estimateSize: () => 80,
    overscan: 5
  });
  // Auto-scroll to bottom on new messages
  useEffect(() => {
    virtualizer.scrollToIndex(messages.length - 1);
  }, [messages.length]);
  // render virtualized list...
}
These are the foundations. Production deployments also need: message retry logic, offline queuing, file upload handling, rich media rendering (carousels, cards, tables), accessibility (ARIA roles, keyboard navigation), and responsive design for mobile. Each adds 20-40 hours of development time.
AI Integration Patterns: Connecting Your React Chat to LLMs
The UI is the easy part. The real complexity (and cost) lives in the AI layer. Here are the three main patterns for connecting a React chatbot to AI backends.
Pattern 1: Direct LLM API (OpenAI, Anthropic, etc.)
The simplest approach - call the LLM API directly from your backend and stream responses to the React frontend via SSE.
// API route (Next.js example)
export async function POST(req) {
  const { message, conversationHistory } = await req.json();
  const stream = await openai.chat.completions.create({
    model: 'gpt-4o',
    messages: [
      { role: 'system', content: SYSTEM_PROMPT },
      ...conversationHistory,
      { role: 'user', content: message }
    ],
    stream: true
  });
  // Stream response back to React client via SSE
  return new Response(stream.toReadableStream());
}
Pros: Full control over prompts, model selection, and response handling.
Cons: You manage prompt engineering, context windows, token costs ($5-20 per 1,000 conversations with GPT-4), rate limiting, error handling, and model version upgrades. Costs scale linearly with usage.
Pattern 2: RAG (Retrieval-Augmented Generation)
For chatbots that answer questions about your specific content (documentation, product catalog, help center), RAG combines vector search with LLM generation:
- Embed your content into a vector database (Pinecone, Weaviate, pgvector)
- When a user asks a question, search for relevant content chunks
- Pass retrieved context + user question to the LLM
- LLM generates an answer grounded in your actual content
This is essentially what platforms like Conferbot do with the AI knowledge base feature - but building it yourself requires managing embeddings, vector storage, chunking strategies, and retrieval quality. Budget 80-120 hours for a production RAG pipeline.
Pattern 3: Conversation Flow Engine
For structured chatbot interactions (lead qualification, appointment booking, surveys), a flow engine manages the conversation state machine:
// Simplified flow engine
const flows = {
  'lead-qualify': {
    steps: [
      { id: 'greeting', message: 'Hi! How can I help?',
        options: ['Get a quote', 'Book a demo', 'Support'] },
      { id: 'company-size', message: 'How many employees?',
        type: 'input', next: 'budget' },
      { id: 'budget', message: 'What is your monthly budget?',
        options: ['Under $500', '$500-2000', '$2000+'] }
    ]
  }
};
Pros: Predictable behavior, no AI costs for structured flows, easy to test.
Cons: Rigid - cannot handle unexpected user inputs. Best used as a hybrid with AI fallback.
The Hybrid Approach (Recommended)
Production chatbots typically combine all three patterns:
- Flow engine for structured interactions (booking, qualification, surveys)
- RAG for knowledge-based Q&A ("What are your pricing plans?")
- Direct LLM for open-ended conversation and fallback
This hybrid approach is exactly what managed platforms provide out of the box. Building it yourself is possible but requires significant engineering investment in orchestration, fallback logic, and context management. Platforms like Conferbot abstract all three patterns behind a no-code builder, letting you configure flows, upload knowledge base content, and enable AI conversation - without writing orchestration code.
The SDK Approach: Integrating a Pre-Built Chatbot in React
If the build approach seems like overkill for your use case (and for most teams, it is), here is how to integrate a chatbot SDK into your React application in under an hour.
Method 1: Script Tag Embed (Simplest)
The fastest integration method - add a script tag to your React app's HTML template or use a useEffect hook:
// ChatbotEmbed.jsx
import { useEffect } from 'react';
export default function ChatbotEmbed() {
useEffect(() => {
const script = document.createElement('script');
script.src = 'https://widget.conferbot.com/embed.js';
script.setAttribute('data-bot-id', 'YOUR_BOT_ID');
script.async = true;
document.body.appendChild(script);
return () => document.body.removeChild(script);
}, []);
return null; // Widget renders itself
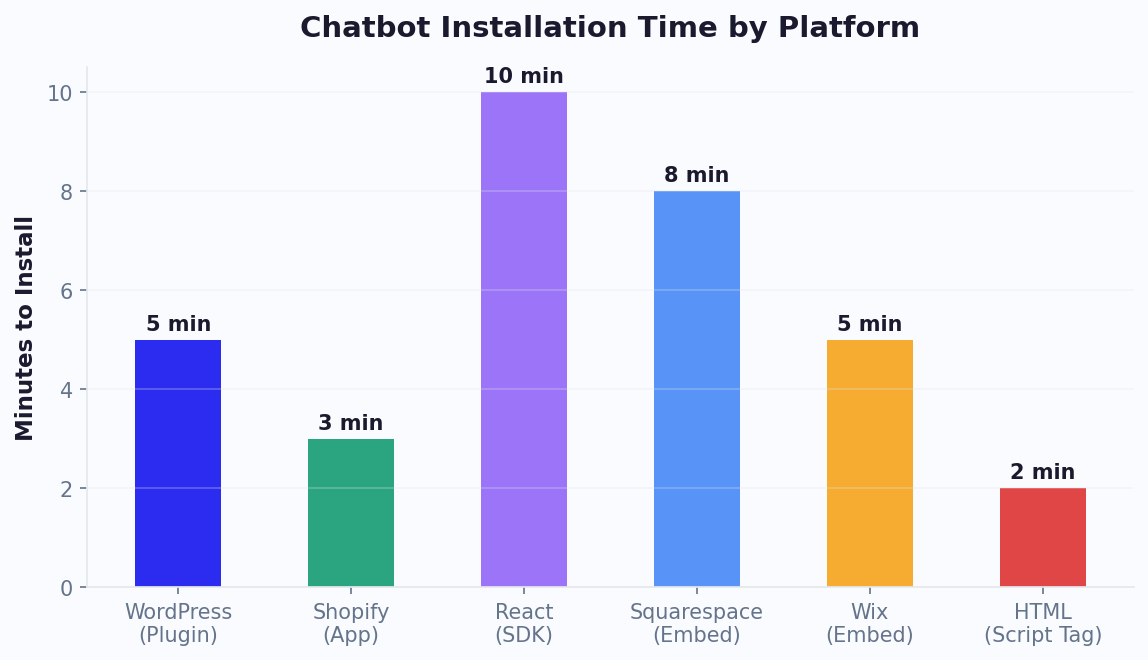
}This approach works with any React setup - Create React App, Next.js, Vite, Gatsby. The widget manages its own DOM, state, and styling. Integration time: 5 minutes.
For detailed framework-specific instructions, see the React installation guide.
Method 2: React Component SDK (More Control)
For deeper integration - controlling when the chat opens, passing user context, handling events - use a React-native SDK:
// Using a chatbot SDK as a React component
import { ChatWidget } from '@conferbot/react';

function App() {
  return (
    <ChatWidget
      botId="YOUR_BOT_ID"
      user={{
        name: currentUser.name,
        email: currentUser.email,
        plan: currentUser.subscription
      }}
      theme={{
        primaryColor: '#4F46E5',
        position: 'bottom-right',
        borderRadius: '12px'
      }}
      onMessageSent={(msg) => analytics.track('chat_message', msg)}
      onLeadCaptured={(lead) => crm.createContact(lead)}
    />
  );
}
This gives you React-native props for customization, event callbacks for analytics, and user context passing for personalization - without building the chat infrastructure.
Method 3: Headless API (Maximum Flexibility)
For teams that want to build their own UI but leverage a managed AI backend, the headless API approach provides the best of both worlds:
// Custom UI + managed AI backend
import { useConferbotChat } from '@conferbot/react-headless';

function CustomChatUI() {
  const { messages, sendMessage, isTyping } = useConferbotChat({
    botId: 'YOUR_BOT_ID',
    userId: currentUser.id
  });
  // Render messages with your own components
  return (
    <div className="my-custom-chat">
      {messages.map(msg => (
        <MyMessageBubble key={msg.id} {...msg} />
      ))}
      {isTyping && <MyTypingIndicator />}
      <MyInput onSend={sendMessage} />
    </div>
  );
}
With the headless approach, you own the UI completely (matching your design system pixel-for-pixel) while the platform handles conversation AI, message storage, analytics, and multi-channel delivery. This is ideal for product teams with strong design opinions but no desire to build NLP infrastructure.
7 Common Pitfalls When Building React Chatbot Components
Whether you build or buy, these are the mistakes we see most frequently in React chatbot implementations. Avoiding them will save you weeks of debugging.
Pitfall #1: Not Virtualizing the Message List
A chatbot conversation can accumulate hundreds of messages. Rendering all of them in the DOM causes noticeable jank, especially on mobile. Always virtualize using react-window or @tanstack/react-virtual. The threshold where performance degrades is lower than you think - around 50-80 messages without virtualization on mid-range mobile devices.
Pitfall #2: Ignoring Mobile Responsiveness
60-70% of chatbot interactions happen on mobile. A chat widget that works on desktop but is unusable on a 375px screen fails the majority of your users. Key mobile considerations:
- Full-screen chat mode on screens under 768px
- Virtual keyboard handling (resize the chat window, keep input visible)
- Touch-friendly tap targets (minimum 44x44px for buttons and quick replies)
- Smooth scroll behavior without bounce conflicts
If deploying on mobile apps, consider native integration via Android, iOS, or Flutter SDKs rather than webview embeds.
Pitfall #3: No Offline/Reconnection Handling
Users lose connectivity. WebSockets drop. The chatbot must handle this gracefully:
- Queue messages sent during disconnection
- Automatically reconnect with exponential backoff
- Show connection status to the user
- Replay queued messages on reconnection
Without this, users lose messages and trust the chatbot less.
Pitfall #4: Blocking the Main Thread with AI Responses
LLM responses take 1-5 seconds. If your implementation blocks the UI while waiting, the app feels frozen. Always use streaming responses and render tokens as they arrive. The typing indicator should appear immediately, and the response should stream word by word - matching the UX users expect from modern AI interfaces.
Pitfall #5: Ignoring Accessibility
Chat widgets are notoriously inaccessible. At minimum, implement:
role="log"on the message container witharia-live="polite"role="textbox"on the input with proper labeling- Keyboard navigation for all interactive elements (buttons, quick replies, links)
- Focus management when the chat opens and closes
- Screen reader announcements for new messages
Pitfall #6: Not Persisting Conversation State
If a user refreshes the page and loses their entire conversation, they will not use the chatbot again. Persist conversation state in localStorage (for anonymous users) or your backend (for authenticated users). Restore seamlessly on page load.
Pitfall #7: Underestimating Ongoing Maintenance
The initial build is 30% of the total effort. The remaining 70% is maintenance: AI model updates, security patches, performance optimization, new message types, accessibility improvements, and cross-browser testing. Budget 40-80 hours/month for maintenance on a custom-built chatbot. This is the single biggest argument for using a managed platform - maintenance is included in the subscription, and the platform team handles updates, scaling, and improvements continuously.
Decision Framework: When to Build, When to Buy, When to Go Hybrid
Here is a definitive decision framework based on our experience with hundreds of React chatbot deployments.
Build From Scratch When:
- Chat is your core product. If you are building a customer messaging platform, a telehealth app, or a product where the chat experience IS the product, you need full control over every pixel and interaction.
- You have 2+ dedicated frontend engineers who can commit to the chatbot long-term (not just the initial build).
- Your chat requirements are highly unique - custom message types, real-time collaboration features, or domain-specific interactions that no SDK supports.
- You have in-house AI/ML expertise to build and maintain the NLP pipeline, or you are using chat as a thin UI over an existing AI system.
- Compliance requires full data control - some healthcare and financial applications require on-premise deployment with zero third-party data processing.
Buy (Use a Platform SDK) When:
- Chat is a feature, not the product. You need a chatbot for lead capture, customer support, or onboarding - but your product is something else entirely.
- Time-to-market matters. You need a chatbot live in days, not months.
- Your team is small. Spending 200-400 hours building a chatbot means 200-400 hours not spent on your core product.
- You need multi-channel. If you want the same bot on website, WhatsApp, Messenger, Instagram, Telegram, and Slack - building separate integrations for each channel is a massive undertaking. Platforms handle this natively.
- Non-technical team members need to manage the bot. Marketing and support teams need a no-code interface to update conversation flows, not a code deployment.
Go Hybrid When:
- You want a custom UI with managed AI. Use the headless API approach: build your own React components for the chat interface, but let the platform handle conversation AI, analytics, and multi-channel routing.
- You are migrating from custom to managed (or vice versa). Start with an SDK to validate the use case, then gradually build custom components as needed. Or start custom and realize maintenance is unsustainable - migrate the backend to a managed platform while keeping your UI.
Decision Matrix
| Scenario | Recommendation | Estimated Cost (Year 1) |
|---|---|---|
| SaaS product, chatbot for support | SDK integration | $1,200-6,000 |
| E-commerce, lead capture + cart recovery | SDK integration + Shopify plugin | $1,200-6,000 |
| Messaging product (chat IS the product) | Build from scratch | $100,000-250,000 |
| Healthcare portal with triage chatbot | Hybrid (custom UI + managed AI) | $15,000-50,000 |
| Agency building chatbots for clients | Platform with white-label | $3,000-12,000 |
| MVP / prototype | SDK (validate first, build later if needed) | $600-2,400 |
Performance Optimization: Making Your React Chatbot Fast
Regardless of build or buy, performance directly impacts user engagement. A chatbot that takes 2+ seconds to load or feels sluggish loses 40% of potential interactions. Here are the optimizations that matter most.
Lazy Load the Chat Widget
Do not include the chatbot in your initial bundle. It is not needed until the user interacts with it.
// Lazy load the chatbot component
import { lazy, Suspense, useState } from 'react';

const ChatWidget = lazy(() => import('./ChatWidget'));

function App() {
  const [showChat, setShowChat] = useState(false);
  return (
    <>
      <button onClick={() => setShowChat(true)}>Chat</button>
      {showChat && (
        <Suspense fallback={<ChatSkeleton />}>
          <ChatWidget />
        </Suspense>
      )}
    </>
  );
}
This keeps your main bundle lean. The chatbot JS (typically 50-150KB for a full-featured widget) loads only when needed. For SDK embeds, use the async attribute on the script tag - which the React install guide covers in detail.
Optimize Message Rendering
Key rendering optimizations for chat performance:
- Memoize message components: Messages do not change after rendering. Use
React.memoon every message component to prevent re-renders when new messages arrive. - Use stable keys: Use message IDs, not array indices, as keys. Index-based keys cause full re-renders when messages are prepended (e.g., loading older messages).
- Debounce typing indicators: Do not send a typing event on every keystroke. Debounce to 300ms intervals.
- Batch state updates: When receiving multiple messages rapidly (bot response + quick replies + system message), batch the state updates to avoid three separate re-renders.
Reduce Bundle Size
If building custom, audit your dependencies. Common chatbot dependencies and their sizes:
| Dependency | Typical Size (gzipped) | Alternative |
|---|---|---|
| socket.io-client | ~25KB | Native WebSocket + reconnection logic (~2KB) |
| marked (Markdown rendering) | ~12KB | marked-react or custom renderer (~4KB) |
| date-fns (timestamps) | ~6KB (tree-shaken) | Intl.RelativeTimeFormat (0KB, native) |
| emoji-mart (emoji picker) | ~80KB | Native emoji input (0KB) |
| react-window (virtualization) | ~6KB | @tanstack/react-virtual (~5KB) |
A lean custom chat widget can ship at under 30KB gzipped. A dependency-heavy one easily balloons to 150KB+. For SDK integrations, the platform handles optimization - Conferbot's embed script is under 40KB gzipped and loads asynchronously, adding zero impact to your page's initial load time and Core Web Vitals scores. This is a significant advantage over custom builds where bundle optimization often becomes an afterthought that degrades page performance.
Connection Management
WebSocket connections are expensive on mobile devices (battery and bandwidth). Optimize connection lifecycle:
- Open the connection when the chat widget is opened, not on page load
- Close (or downgrade to polling) when the widget is minimized
- Use connection pooling if your app has multiple real-time features
- Implement heartbeat intervals appropriate for mobile (30-60 seconds, not 5)
These optimizations matter more than they seem. A chatbot that drains mobile battery or consumes background bandwidth gets uninstalled or blocked by users. The platforms that survive in production are the ones that respect device resources. For WordPress and Shopify deployments, SDKs handle all connection management automatically. For Shopify-specific deployment patterns and e-commerce optimizations, our Shopify chatbot guide covers the unique performance requirements of storefront widgets that must not interfere with checkout flows or Core Web Vitals scores.
Testing React Chatbot Components: A QA Framework
Testing chatbot components requires a different approach than testing standard React UI. Conversations are inherently non-deterministic when AI is involved, and real-time communication introduces async complexity that standard unit testing cannot capture. Here is a QA framework based on React Testing Library best practices adapted for chat interfaces.
Test Categories by Priority
| Test Type | What to Test | Tools | Priority |
|---|---|---|---|
| Unit tests | Message parsing, state reducer, formatting utils | Jest + React Testing Library | Essential |
| Integration tests | Message send/receive flow, WebSocket reconnection, handoff logic | Jest + MSW (Mock Service Worker) | Essential |
| Visual regression | Message bubbles, cards, rich media, responsive layouts | Chromatic or Percy | Important |
| Accessibility | ARIA roles, keyboard navigation, screen reader announcements | jest-axe + manual screen reader testing | Essential |
| Performance | Render time with 500+ messages, memory usage, bundle size | React Profiler + Lighthouse | Important |
| E2E conversation | Full conversation flows from greeting to resolution | Playwright or Cypress | Important |
Critical Test Scenarios
These scenarios catch the bugs that cause real user frustration:
- Connection loss mid-conversation: Verify messages queue offline and replay on reconnection without duplication or loss
- Rapid message bursts: Send 10 messages in 2 seconds. Verify ordering is correct and no messages are dropped.
- Long conversations: Simulate 200+ messages and verify scroll performance stays above 60fps and memory usage stays stable
- Rich media rendering: Test image loading failures (broken URLs), oversized images, and missing alt text
- Concurrent sessions: Open the chat in two browser tabs. Verify messages sync correctly and no state corruption occurs.
AI Response Testing
For custom-built chatbots with AI integration, test the response pipeline separately from the UI. Use pytest fixtures (or Jest equivalents) to create deterministic test conversations that verify prompt formatting, context window management, and fallback behavior when the AI service is unavailable. SDK integrations bypass this complexity entirely, as the platform handles AI reliability. For teams managing conversation flow templates, testing becomes particularly important when flows branch across multiple conditions and intents. Track test coverage alongside your chatbot analytics metrics to ensure quality keeps pace with feature expansion. Aim for 80% or higher coverage on critical conversation paths before any production release.
Our Recommendation: Start With SDK, Customize Later
After building and reviewing hundreds of React chatbot implementations, our recommendation for most teams is clear: start with an SDK integration, validate the use case, then build custom only where the SDK falls short.
The Validation-First Approach
- Day 1: Integrate a chatbot SDK (like Conferbot) into your React app using the React installation guide. Total time: 1-2 hours.
- Week 1-2: Configure conversation flows using the no-code builder. Set up lead capture, FAQ responses, and appointment booking.
- Month 1: Analyze chatbot analytics. Measure engagement rates, lead capture, support deflection. Validate that the chatbot delivers ROI.
- Month 2-3: If the SDK meets your needs - stop. You are done. Invest your engineering time elsewhere. If specific UI requirements demand custom components - use the headless API approach. Keep the managed AI backend but build your own React UI.
- Month 6+: If and only if chat is becoming a core product differentiator and the SDK genuinely constrains you - consider a full custom build. You will have 6 months of conversation data, proven flows, and clear requirements to guide the build.
Why This Approach Wins
The validation-first approach eliminates the biggest risk in chatbot development: building the wrong thing. We have seen teams spend $150,000 building a custom chatbot with features their users never used, while neglecting the simple lead capture flow that would have generated 10x ROI from an SDK integration.
Start simple. Measure what works. Invest engineering effort where it creates differentiated value. For everything else, let the platform handle it.
Ready to get started? The React integration guide walks you through deployment step by step - from script tag to full component SDK to headless API. Most developers are live within the first hour. Check pricing to find the plan that fits your traffic and feature needs, and explore chatbot templates to accelerate your first deployment. The validation-first approach has saved hundreds of teams from the most expensive mistake in chatbot development: building a $200,000 custom solution for a problem that a $200/month platform solves out of the box. Do not let engineering pride override business pragmatism. Validate first, then invest engineering effort where it creates genuine competitive differentiation.
Developer Resources and Ecosystem
The React chatbot ecosystem in 2026 benefits from mature tooling. npm's chatbot React packages now number over 200, ranging from bare UI kits to full-platform SDKs. For developers comparing options, the key evaluation criteria are: bundle size impact, TypeScript support, accessibility compliance, and active maintenance. Before building from scratch, evaluate whether existing solutions meet your requirements. For Python developers considering backend architecture, our Python chatbot vs no-code comparison provides relevant context on the backend decision alongside this frontend guide.
Was this article helpful?
Build and deploy in 10 minutes. No coding needed.
React Chatbot Component FAQ
Everything you need to know about chatbots for react chatbot component.
About the Author
The Conferbot team writes about building, deploying, and improving AI chatbots.
View all articles

